Showing posts with label paint. Show all posts

Wednesday, January 31, 2018

Tween Girl Room

 I mentioned last week when I shared my before and after pictures of the kitchen island here that I spent part of the summer painting and decorating the kids rooms.  I want to show you the first one.  My oldest is a tween, as much as I don't want to admit it, so I had to try and think of something that she could grow with in the next few years into being a teenager.  This is what her and I came up with.

To start out with the walls were all white. This is the first time that we have bought a house so we have been having fun with painting and not having to worry about changing it or getting permission from the landlord (I never painted any of our old places for these reasons).  My daughter loves pink so we went that direction. 


First thing I did was paint the entire room light pink.  She is still using the quilt that I made her here.
She is also a huge Harry Potter fan so she also had to hang her banner.  

On the big main wall on the other side of the room, I cut out a whole bunch of little circles using my Cricut with gold vinyl.


She thinks this wall is so cool!!


The last thing is the corner with the desk and chair.  That desk has been handed around between my aunts and then to me and then to my sisters, it has been sitting in my parents basement not getting used.  They brought it over for us.  


It needed a little love before I could put it in her room.  I had put wall paper flowers on the desk when I used it forever ago, I had to remove those and give it a new coat of paint. Also it used to have gold accents then I painted it when I did the flowers, covering the accents.  I brought the gold accents back with some gold paint and it was set to go.

The chair was a bit more work, it was one of our old kitchen table chairs, so it was wood stained and the back and legs were black.  The seat I painted white with chalk paint and the back and legs I spray painted with gold paint. 


I put them in her room and it was finished!!


Wednesday, January 24, 2018

Kitchen island

We moved into a brand new house just short of a year ago.  I was doing some painting in the kids' rooms this past summer, and this just kind of happened one night while doing them.  The walls around the island were really bugging me it didn't seem to flow with the rest of the kitchen, also the kids kept trying to scale the walls while holding onto the counter and the white was showing all their footprints.  I had black paint from my project in the boy's room so the island got an update as well.

 Here is the island before we moved in. It really didn't seem to sit right with the white paint.


Here is After! I love it so much, the braces/brackets for the the counter top don't stand out now and I no longer see dirty footprints. Double win!


Monday, February 3, 2014

Birthday Blocks


At church I work with the kids up to age 12 we don't have a lot of kids in our group just because of the size of the congregation, so we wanted to do something a little different for them then the usual pencil and bracelet.  This is what we came up with.  

We had a 2x4 cut into 6 inch pieces for us.  We made a total of 20 complete blocks and we still have probably another 15 unpainted blocks leftover from the project.  As you can see we painted them all black.

  After the paint dried we used mod podge and attached a picture of the temple that we have been assigned to attend.  In this case it is the Washington D.C. temple.  We were originally going to find out what each kid's favorite temple was but then decided that it would cost too much and might be difficult to get a picture of that temple the size we wanted.  After the mod podge dried we added the vinyl saying (which I cut out on my cricut and I got about 26 of the saying's to the sheet) then put another layer of mod podge to secure the vinyl on the blocks (mostly because we were giving them to the kids).

For the girls we attached a purple ribbon around the block.  After giving the first block to one of the older girls yesterday I suggest hot gluing the completely around the blocks.  I only glued under the block and she had untied it and removed the ribbon from the block then had trouble getting it back on.  The boys are receiving green ribbon and I hot glued the ribbon all around it.


The overall cost for everything less then $10

The 2x4 was around $8, I already had the mod podge as well as the paint and we really didn't use that much of either.  We made copies of the pictures of the temple and then I only used one sheet of vinyl that cost me $.99  We are excited how it turned out and the kids were excited to see them for our first birthdays.


More the Merrier Monday

Monday, January 27, 2014

Bathroom Redo


I am so excited! My mom has been doing some upgrades on her house this past year.  I asked her if she would share some of them that they did with all of you.  I'm so happy that she did this.  Thanks Mom!!


My daughter asked me to share a little bit of some of the projects we did this summer/fall/winter.  There are a lot of projects so we will start small.  Here is what we did in our master bathroom.

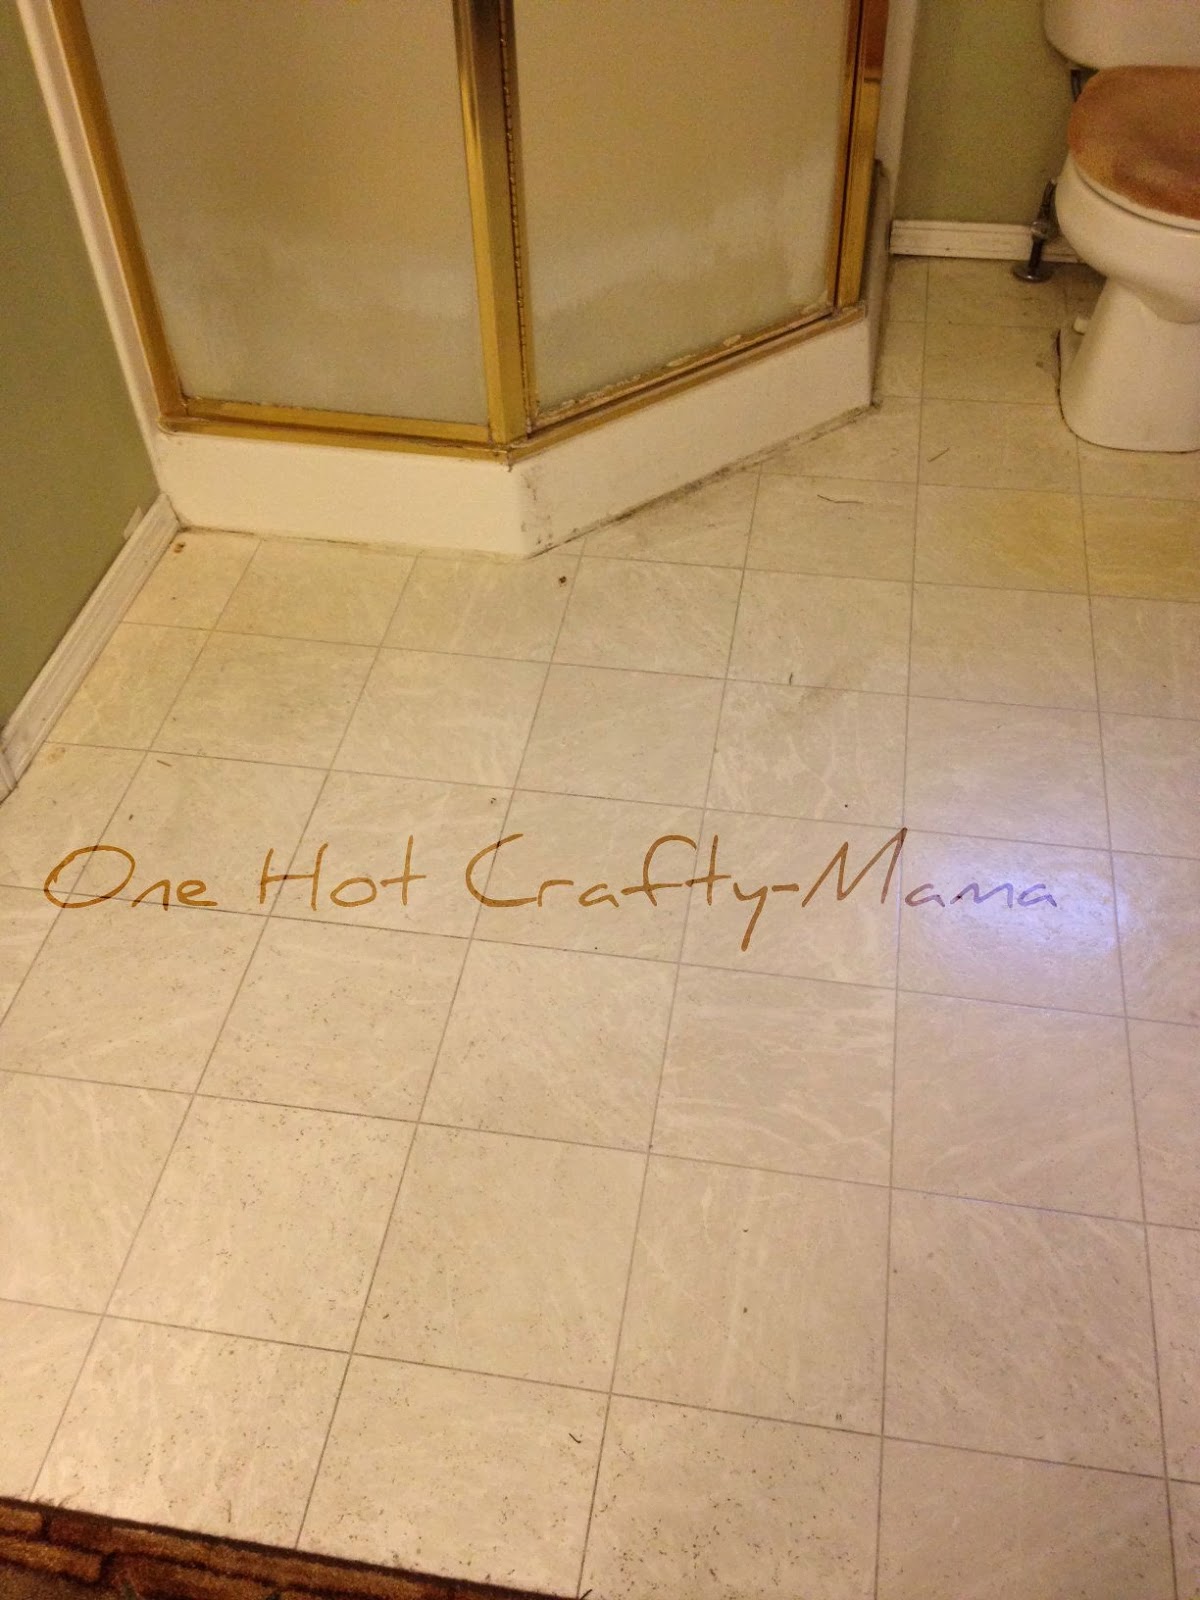
It started out a sage green (sorry, I didn’t think I was going to need to take a before shot of the wall color).  We paid a contractor to tear out our existing shower, install a new shower (which entailed putting tile on two walls) and put new tile on the floors.  Here are the before and after shots of that.


You can see some of the green wall color in these pictures.  This shower was old and UGLY!!!

The floors were showing their age as well!  You can see how the contour rug had discolored the floor around the toilet.


As a side note, a few years ago I sanded down the cabinets (they were that pinkish tone bleached oak) and then stained them Minwax Red Mahogany gel stain.  I ended up using that same technique in my kitchen (I will show it to you another time).


Here are the after shots.

Yes, that is tile not wood.  I wanted the durability (and water resistance) of tile but I really liked the look of wood.

The accent strip is leftover tile from the backsplash we did in our kitchen.  We are so glad we paid a contractor to do this job--he struggled with the shower install so there is NO WAY we would have got it right.

Our bedroom and bathroom had been painted the same wall color.  In the middle of all our projects I decided the bedroom needed to be repainted a more neutral color.  This, of course, meant the bathroom was going to have to be painted. 

Here is what the sink/countertop/mirror looked like before.


I actually painted the “panels” between the glass over the lightbulbs when I painted the bathroom green several years ago.  I never really did like the light fixture at all so NOW was the time to replace it.

Here is the new fixture:


We had a hard time finding a light fixture, for the price we were willing to pay, in the oil rubbed bronze that we had switched all our faucets.  We ended up buying one in a brushed nickel finish and I spray painted it with Rustoleum Oil Rubbed Bronze spray paint.

You can see the new wall color as well.  I still wanted to keep the “tropical” theme but figured neutral walls would give me more flexibility in the colors I could introduce as well as make my existing decor really pop!

I have seen several posts on pinterest on “framing” contractor grade mirrors.  I have wanted to do it but my husband was afraid it would make it feel closed in.  After putting the new light fixture up I really wanted to put a frame on the mirror.  When I sent my daughter the above picture she said the same thing so I just told my hubby I was going to do it.  We are BOTH glad we did it!!


I had read several posts about how to do it but obviously didn’t pay attention to ALL the details--I will explain more in a bit.  I knew I would never get the corners mitered the way I liked them so I bought decorative corner blocks so I could cut the moulding with straight edges.  I bought wood moulding and wood corner blocks.  I stained them the same Minwax Red Mahogany gel stain as the cabinets.  I glued the four corner pieces onto the mirror, then I measured (twice, teehee) the distance between the corners to know what size to cut my pieces of moulding.  I measured each side because I knew that each set of sides would not be identical.  Case in point, my left short side measured 30 3/4” and the right short side measured 31”.  I used adhesive I found at Lowe’s that said it was instant setting (liars!!!).  I let the corners set for about a half hour but as I measured and then installed the sides those corners sure moved around A LOT!!  It took some patience but I got the pieces up.  One of my moulding pieces was bowed so it took both of us to push on it to make it stick.  The picture up above is when I finally got it all to stick----or so I thought! 

The next day I noticed that one of the short sides was also bowed and it had popped off halfway down.  I tried to squirt glue in there--easier said than done.  Still couldn’t get it to  stick.  In all that mess, the entire side popped off.  So I tried gluing it all over again.  Next day it still wasn’t stuck.  So I popped it off again, scrapped off all the glue on the mirror (a straight razor blade works GREAT!) and the back of the board (I used a flat screw driver for that).  I looked up on pinterest other posts to see what they used for glue and one said she used good old HOT glue.  So......I went and got my trusty hot glue gun and gave it a shot!  It STUCK--bowed end and all!!!  You have to work fairly fast with the hot glue because it sets up fast as it cools.  Be ready to attach it to the mirror quickly and get it exactly in the place you want it on the first try. 

The same blog post said she had done TWO mirrors.  One with wood moulding and one with MDF moulding.  She said she had the same problem with bowed wood (that’s why she ended up using the glue gun) but no problem with bowing with the MDF.  She spray painted the moulding using the same spray paint I had used on my light fixture.  I don’t have anymore mirrors that need framing but if I was to do it again, I would use MDF and my good old HOT glue gun.  This gal said she also used super glue in some of the more stubborn spots.  I didn’t have to resort to that to know if it works or not.

That’s it for my bathroom projects......for now!  We are going to put ledge stone on the skirt of our jetted tub.  I will take pictures and do a post on that when we are done.


TDC Before and After

Monday, January 13, 2014

TV Remote Crate


 We seem to always have a problem of where to put our remotes.  Kind of out of frustration of them not having a place I used a crate that we had laying around from buying some oranges and put them in there then it sat like this for a few months.  My husband and I both liked having the crate but I needed it to be a bit nicer looking and without glue on the sides.


 So first things first I used a flat head screwdriver and peeled the glue off of both sides of the crate.  I did manage to put quite a few dents in the sides and scraped some skin off of my fingers but it came off.  I'm sure there was a much easier way to do that but that is what I went it.


 Then I sanded the sides down a little bit to make it look not so beat up.


 I didn't want it a dark brown nor did I want to sit around and stain it, what I ended up doing was mixing some white paint into the brown I had then painted it on both sides.

 Next was stenciling the word remotes on each side.


 It feels so much better to me when I walk by this now (which is a million times a day)


More the Merrier Monday

Monday, June 24, 2013

4th of July tag

Here is a 4th of July tag that I made from a wood kit that I bought.  I added red, white and blue twine to hold it up.

Monday, May 28, 2012

Toenail Flowers

I used to get pedicures all the time, then I went away to college, got married and had kids.  I can't even tell you the last time that I one.  Something that I miss about them is getting the flower on your big toenail.  I'm not sure why I didn't think of it until recently but I decided that I could do it myself.  I have to warn you I'm sorry about the quality of the pictures I took these at night and the lighting in my house is awful.  Here is my way of doing toenail flowers.


After you have painted your nails your favorite color of nail polish and let them dry.

I used a sharpened pencil and dabbed it into acrylic paint.  Then I used a nail to spread the paint into a petal.  I don't have any paint brushes small enough so this is my makeshift.

I continue until I have a flower.  Then after cleaning the paint off of the pencil and the nail.

 I add a dot for the center.


I do the leaves in the same way that I do the petals then I let it dry.

It's not as nice as when someone else does it but it makes me smile when I look down and see them.

Tuesday, February 21, 2012

Footprint Shamrocks


The kids and I make these this past weekend.  I printed out a shamrock shape then painted their feet green and filled in the shape with their footprints. 

Wednesday, June 22, 2011

Flag Pillows


Look at what I made last week.  I ended up with three of them.  They were tons of fun to make.


First I decided how big I wanted the pillows to be and cut a front and a back for each pillow.  I don't have measurements I eye-balled it this time around.


I then drew out the flag.  I did use a ruler for it, I made the flag 9in x 9in. 


Next I painted them in.  I even painted the white stripes even though the fabric was white when I was done I was glad I did.


After they were painted.  At this time I cut out pieces of burlap,  I purposely made the burlap bigger than the fabric because I wanted to make sure the burlap would stayed sewed in.


I then put the burlap piece over the painted piece and sewed around the flag and each of the stripes.


This picture shows better what I did.


I then cut out the burlap between each of the lines of thread, allowing the paint to show through.

From there I added the back piece over the flag and sewed around the edges allowing a gap on one side so I could turn it outside out and add batting.  I ran out of batting after stuffing one and half of the pillows, I then used some of the extra grocery sacks that we had since they are decor pillows not ones intended for use.  After sewing up the hole I put them in their spots on the couch and chair.