Monday, February 28, 2011

Matching brother and sister outfits


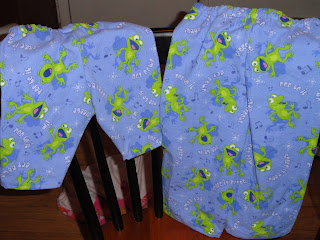
I found this fabric at Joann's on clearance and thought that it would work for both a girl and a boy. My daughter loves frogs and I figure generally boys like frogs too so this should work. So I made some pants for both of them.


I also bought a plain white onesie and a blank white t-shirt. I made freezer stencil shirts that matched to go with the pants.


Here they are all put together. I'm sorry about the dark pictures, they were taken at night and I tried some during the day and they looked worse because we have had some cloudy days this last week.I can't wait to see both of them wearing these!!

Friday, February 25, 2011

Chocolate Baked Donuts


My regular Baked Donuts were such a hit that I decided to make some Chocolate ones and try baking some in a mini muffin pan.
It makes it a lot easier to put the batter into the pans if its pretty runny. I used a spoon to put the batter into the pans.

I filled the mini donut pan a little too full, they still turned out okay but next I'm going to put a little less in each one.


When baking the muffin pan I had to add a couple of minutes to the cooking time. This is what they looked like after they came out of the oven.


I made some glaze with a cup of powder sugar and 2 tablespoons of hot water. This time instead of drizzling the glaze over the donuts I took them and dunked them into the glaze. I like how they turned out this time around.


Thursday, February 24, 2011

Music Cupcakes

Last month it was Mozart's birthday. I'm not usually one to celebrate everyone's birthday but I was craving some sugar so this was an excellent excuse. My husband came up with the idea of putting music notation on them. We had a blast putting them together.


I used a basic recipe for butter cream frosting. To make the frosting true black I separated the frosting into two parts leaving one of them white. The second part I mixed in some powdered cocoa to make it brown and not to mention it tasted chocolaty as well. Double bonus!! :) After I made sure that the powder was mixed in really well I used some black food coloring and it didn't take very much coloring at all to get it black.


Wednesday, February 23, 2011

I joined a blog hop

This is a blog hop for brand new blogs, you are more than welcome to join!!


New Shorts

My daughter was given these pants last winter and has just loved them to death. This summer holes in the knees began to form and like any three year sees a hole and she just had to help it continue to get bigger in a matter of seconds. So these pants had two huge holes one in each leg. What was nice was that the holes were formed in about the same spot. So I cut off each leg and made sure that they matched in length. I forgot to take a before picture of them before I cut the legs off. So this is after the legs got cut off :)


I cut two strips of fabric and made them into tubes. I made sure that the fabric was turn with the right side out and then basted across the top and created a gather. I then pinned the fabric to the outside of the pant leg, so the ruffle looked like it was upside down. After stitching it to the pants I flip the ruffle back down and top stitch across the bottom of the leg to make the ruffle stay down. These are how they turned out.
My daughter loved them and found them the next day and wore them the whole day, never mind that it was in the 20s outside. I'm glad that she still likes them.

Tuesday, February 22, 2011

Nursing Pillow

When my daughter was born, it was right before all the little cute things that help out with little ones came out. So I didn't have any of them. I decided that I wanted to try out a nursing pillow with this next one. I found some cute fabric on clearance at Joann's and played around with some stuff and came up with this.
I ended up using a whole bag of stuffing to fill it. Now its ready for when this little one decides to join us, not for a couple of more months though. :)

Monday, February 21, 2011

Service Sign


I was blessed to grow up in a home that taught me a lot serving and how important it is in our lives. I remember that the cookies always tasted better after we took some of them to a friend or neighbor. My dad would wake us kids up early on a Saturday morning to go do a service project, as a teenager I wasn't happy at first about it but was always glad that I did it in the end. As my family is growing I am hoping that I can provide the same learning opportunities in my home about how important serving others are in our lives.

There is a children's magazine that is produced by my church (LDS) that my daughter gets every month and wears it out by looking at it so much. In this month's issue there is an article in the front of it that talks about serving I got this statement from it and just had to turn it into something that we had hanging in our home.


I found the wood at Hobby Lobby for about $3. I painted it black and after it dried I sanded it down a little bit on the edges. I then cut out some vinyl, this is the first project that I have cut out my own vinyl off of my Cricut it was a huge learning experience. I learned that not only changing the pressure but also the blade depth for whatever material you are working with helps out a lot!!!


After I got the vinyl on I decided to put a thin coat of mod podge on it. With other projects with mod podge as it is drying it sticks to the paper that I used to protect my work surface, it happened again with this one, luckily it stuck on the back so no one can see it but when I did the layer of mod podge on the back I decided to try wax paper as a dry surface and it worked great!! I'm going to try it again on the next project and see if it works just as well.

Saturday, February 19, 2011

Organizing the Kitchen Cupboard and Shelves

It seems that this winter every Saturday I go through a cleaning/organizing frenzy. Part of it is probably that I have been home most of the week and it starts to drive me crazy, another part is I'm going through a nesting phase. Today I tackled our kitchen cupboard and shelves. We live in a decent apartment but the kitchen is really small, We have one bigger cupboard that my food goes in as well as some small ones that are up high where I really can't reach. When we moved in we bought a set of plastic shelves so we could have some more storage space, so we have food stored there as well. Every thing was looking and feeling chaotic we had to dig around for everything that we needed and it was always in a different spot. This morning after we went grocery shopping and as I was putting food away I finally had it. I took everything out of the cupboard and off of the shelves and reorganized things around. Now I love my cupboard and keep opening it just to look at it.
My cupboard before


My Shelves before

It's pretty bad huh? I know it has been bugging us for a while.


After
Look there is even room for more!!!

The shelves feel breathable to me finally. (Yes I know that is a lot of hot chocolate, it was on sale awhile ago for $.50 and it was the beginning of my pregnancy it was one of the only things that calmed my tummy and heartburn.)


Friday, February 18, 2011

Baked donuts

I had a rediscovery of a donut pan that my grandma sent me a couple of years ago, it was great because I didn't have to cook them in oil I just baked them in the oven and they tasted just as good if not better than deep fried, not to mention are a lot healthier for you. This is the pan that she sent me, its from Norpro.
I have been perfecting the amount of batter that should go into them as well as decorating them. I think that I finally got it!! These were gone by the next day. I used the recipe that came on the back of wrapper of the pan.
I dipped half of them in cinnamon sugar and the other half was glazed.


Cake Donuts

2c flour
3/4 c sugar
2tsp baking powder
1 tsp salt
1 T butter, melted
2 eggs, beaten
3/4 c milk
1 tsp vanilla
1/4 tsp nutmeg
1/4 tsp cinnamon

Preheat oven to 325 degrees F. Lightly spray Donut Pan with cooking oil. In bowl mix together flour, sugar, baking powder, salt. Add butter, eggs, milk, vanilla, nutmeg, and cinnamon. Beat until well blended. Fill each donut hole 2/3 full. Bake 8 minutes or until tops spring back when lightly touched. Cool. Remove from pan and dip into glaze. Decorate with sprinkles, nuts, shaved chocolate or coconut. Donuts may also be dipped into cinnamon and sugar instead of the glaze. When the pan has cooled, wipe clean with cloth or paper towel and repeat process. Yields approximately 36 mini donuts.


I want to also try them in muffin pans and see how it turns out. I hope that everyone enjoys them as much as we did.

And pants to match....


The onsies wouldn't be complete without some matching pants to go with them. I can't wait to see our little guy in these outfits.


I'm really excited for this outfit because I haven't been able to find anything hockey in the stores and hockey is my husband's favorite sport. I wanted him to be able to dress his son up in some hockey attire.

Thursday, February 17, 2011

Freezer Paper Stencil Shirts

One of my Christmas presents this year was a Cricut Expression. One of the many projects that I have tried out using my cricut with is making stencils with freezer paper to make some of these cute shirts. Freezer paper makes a temporary stencil that is easily removeable, then add some paint, let dry and remove the stencil and voila!! some really awesome shirts.


These ones I made for my daughter and she asks to wear them all of the time.


We have a little one on the way that is a boy. These I thought were tons of fun for him to enjoy when he joins us.

I'm jumping on!!

I have been thinking for awhile that I want to join the many blogs out there that deal with the home, crafting, cooking and sewing. I finally worked up the guts to do it. So I can't wait to get started and have you join me in this adventure.