Showing posts with label sewing. Show all posts

Monday, November 27, 2017

Magic Christmas Blanket

I am so excited to share this with you.  I made it last year but between kids being sick for two months straight and some unexpected health issues with me I wasn't ever able to post this. So I'm making sure that I do it early this year.  

Growing up my Aunt made us a Christmas blanket, it has since then been nicknamed the magic Christmas blanket because you get under it and you fall asleep its so comfy and cozy.  We would fight over it every year as to who gets to have the first nap under it.  I have wanted one of my own for years, and finally after getting enough pictures of one of my parents sending us pictures of them being the first one getting the nap since no one lives at home anymore.  I decided I was going to make my own.  I asked Mom for the measurements of hers and went to the fabric store.

This is what I picked up, 1/4 yard of seven different Christmas fabric and then a yard of white Christmas fabric that was going to be my borders.  Now the big thing about this blanket is that it isn't very wide but it is heavy.  So when buy batting get the thick fluffy kind.

After cutting the blocks and strips of fabric I then sewed everything together.  I had some gingerbread fabric that I have had for years laying around that I used for my backing.  Here is the top of the blanket before I sewed/quilted it together.  I sewed trees down each of the vertical stripes to hold everything together and sewed on a binding. 
 Here is the back of the blanket.


The final product!!! My kids are loving snuggling under it and its just as warm and heavy as the one that my Aunt made for us many years ago.

Friday, November 24, 2017

Matching Sister Aprons

I hope that everyone had a great Thanksgiving.  Now really starts the hustle and bustle of the Christmas season. I wanted to start off with sharing a quick and easy gift for anyone but that its still a lot of fun for the recipient.


I made these matching aprons, for my nieces for Christmas.  I also embroidered their names onto them.  It's is always fun to have a cute apron to bake in and even better when it matches your sister!! To complete the gift I also added some cookie and cake mixes.  Quick and easy but a lot of fun to make memories with.

Tuesday, November 21, 2017

Baby Blanket

My go-to gift for babies are baby blankets with their name embroidered on them.  They are big but not huge and made from soft flannel so they are lightweight and keep them warm.  In fact, my 6 year old still snuggles under his when he is watching movies sometimes.  This is one that I did for my friend I thought that it was so pretty that I needed to share it with all of you. 

Wednesday, December 9, 2015

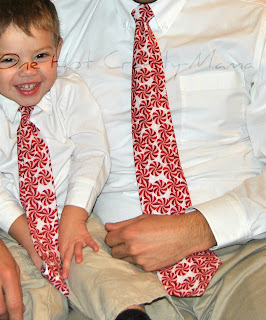
2015 Christmas Ties

I'm sorry the quality isn't the best, I took it from my phone quickly but I wanted to show you guys this year's Christmas ties.  I was so excited when I found this fabric this year and my husband and my boys are loving them.

Friday, January 31, 2014

Another Boy Onesie

 Ok I told you guys that I was excited about this one earlier this week.  I have seen onesies similar on the internet and have always wanted to make one then the hat kind of came along for the ride to complete the package.

 I used a pattern to make the hat.  

The actual onesie itself I kind of winged it and I'm thrilled at how it turned out.  I will definitely will be making more of these.


More the Merrier Monday

Friday, January 3, 2014

Scripture tote

My daughter has had the fabric picked out for months for her new scripture tote and I just now finally was able to make it.
One of her favorite parts is the bow.


I made this in the same way as I have the other bags I have done but I added the big strap instead of two little ones.


Lil\'Luna

Wednesday, January 1, 2014

Felt Scarves

Did you see my Christmas present from my husband?  If not check it out here he did some amazing work on it.


Today I want to share with you a scarf that I saw somewhere on the internet and the price was much more then I wanted to pay and I figured I could do something similar for a fraction of the price.  This is what I came up with. 


They are really easy and all you need is a 1/2 yard of felt, thread that matches the felt, a needle and scissors.  For this particular scarf I think that I did 13 flowers, you can do how many you want to create the desired length.  I usually do about 13-14 for adults, the one that I made for my daughter I think that I did 9 or 10.


For this scarf I cut the number of flowers I was making in 4 different sizes of circles.  I didn't measure or made sure that each circle was a true circle.  When I had one of each size circle cut I used that as a "pattern" for the rest of the circles.  If you are going to put beads in the middle like I did then only cut out four sizes otherwise cut out five circles.


 Here are my circles.


 Next I cut each circle to have wavy edges.  I didn't worry about it being perfect since flowers aren't always perfect and are individually different anyways.

 After all the circles have wavy edges.  Thread your needle and tie a knot at the end of the string.  Then grab a circle of each size (4 layers if you have cut out five its okay hold onto the smallest one for a bit later) and stack them then I folded it in half.


 Then run the needle through the middle making sure it goes through all the layers.

 Then pull the needle through and go through the same direction that you went through previously and pull the thread tight.
 If you were to open the flower it would look like this.


So open the flower and fold it in half the other direction and repeat the same process before.
 
 After I completed that I tied it tight but DON'T cut the thread just yet.


 Open the flower up and stick the needle through the middle and add your beads.  I did the beads individually just so then I could place them a bit more securely. Then I tied it off on the back and cut the thread.


 One completed flower now only 12 more to go.  Repeat the same process for each flower.


 Now if you aren't going to do beads this is where you will use your fifth circle.  I folded it into quarters.

 Then I sewed it into the middle of the flower and tied it off in the back.


When I completed a flower I would attach it to another completed one.  I sewed them together where the other petals would cover the sewing.

 When I first started making the scarves I would sew them onto a piece of felt the length of the scarf.  But I have decided I prefer the look and would rather just sew the flowers together.
 This scarf is with the backing.


 Here is one I made for my sister. 

This one I gave to my daughter's teacher for Christmas.
Lil\'Luna

Friday, December 20, 2013

This year's Christmas Ties

I love love LOVE making my boys matching ties.  Its really easy for me and I can make both of them with a yard of fabric so it isn't that expensive either.  They were finally able to wear them this week to church.

Monday, July 8, 2013

Sippy Cup Holders

We are going on vacation that includes road trips and a lot of walking around sites.  I also have two little ones that still use sippy cups and love to throw them everywhere.  So I decided that I better make a couple of holders for them.  I'm pretty excited how they turned out.

Wednesday, July 3, 2013

4th of July Ties

I love making ties for my husband and son.  I can make them relatively fast and my son thinks it cool to have the same tie as his dad.  Here are the ones I made for them this year for the 4th of July.

Wednesday, June 26, 2013

Matching Sister Dresses!! From one shirt and a yard of Fabric


 I'm so excited about this project.  My daughters are 5 1/2 years apart and I wanted them to have matching dresses for awhile.  I had been looking and couldn't find any since they are so different in sizes.  I decided to make them myself.  I used a t-shirt from the dollar store and a yard of fabric.


To do the top part of the dresses I used the same method as here.  For the baby one I did the same idea but had to cut a neckline and sleeves.


 When I sewed the sleeves onto the shirt part of the dress I laid out the fabric I had decided the length I wanted it (I did 22") and cut across the entire width of the fabric and then cut down the fold as well creating to parts.

I basted the top of the fabric width wise to create a ruffle effect and made it fit to the width of the shirt part, I pinned it to the shirt and sewed it on.  I repeated the process for the back of the dress.  I then sewed the sides together for the dress going from the edge of the sleeves clear down to the bottom of the skirt.  Then all I had to do was hem it.

I did add a little bit of the flowers to the top of the dress for my older daughter and added a bit of a scrunch in the front of the baby's dress.  Otherwise the process was pretty much the same.  Instead of hemming the sleeves and the neckline for the baby's dress I added a binding.


Somewhat Simple
craftionary


More the Merrier Monday