

Wednesday, September 28, 2011
Another sneek peek
Tuesday, September 27, 2011
Tutorial: Fabric Pumpkins

A couple of weeks ago I shared with you some pictures of fabric pumpkins I made and I promised a tutorial on how to make them. Here it is finally!!! These are really simple and you can make whatever size you want.
Materials needed:
scrap fabric (the body of your pumpkin)
a even smaller scrap of fabric (your stem)
pillow filler or a couple of grocery bags
embroidery floss and a large needle
thread and a regular needle

I wanted to make a bigger pumpkin this time. So I used about a half of a fat quarter.

Then I cut out a circle, you can trace something or just free hand it like I did.

Using the needle and thread I ran the thread around the edge of the circle and then tightened it creating a pouch. *Note: be careful to not allow the thread to go all the way through the what you just stitched.

Open the hole up a little bit and add your filler. I didn't have any pillow filler so I stuffed a couple of grocery bags in there and it worked great!!

Then tie your hole close.

Now using your big needle and the floss, start your needle on the bottom of your pouch and push it up through the middle, don't let the floss go through completely bring the end of the floss around the outside of the pouch and tie it off in the middle. *Note: I used all the threads of the floss on this pumpkin on the others I used 4 of the threads.

Go around your pumpkin starting at the bottom up through the middle, to the top and then around the outside back to the bottom (I hope that makes sense), continue at spacing the thread how you want to.

This is what the bottom of mine looks like.
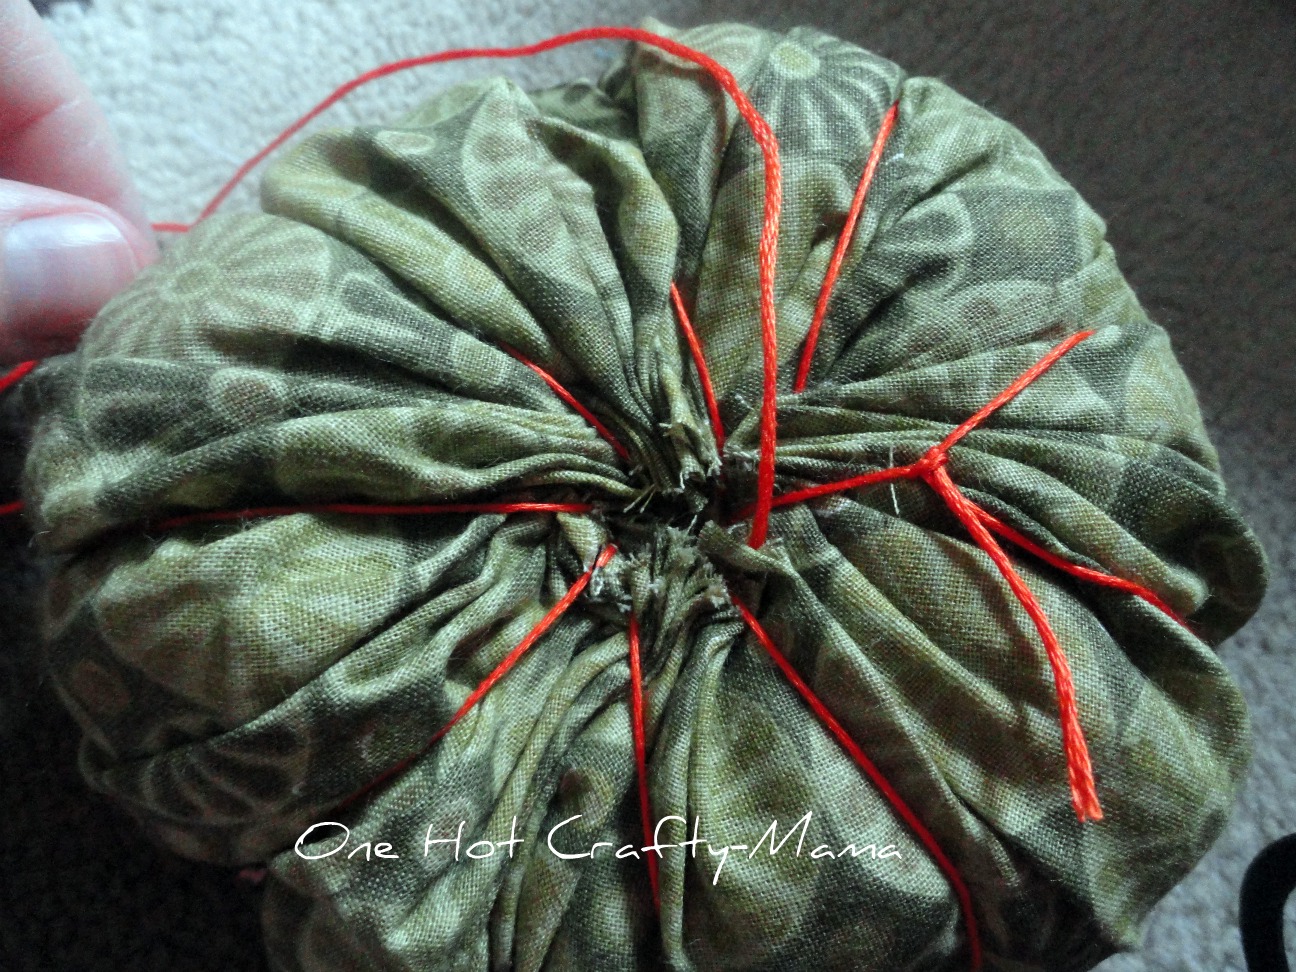
Here is the top. Tie off the floss I used the same spot that I started with. Now set it aside for a moment.

Now using your smaller piece of scrap create and strip. However wide or long is up to the side of your pumpkin and how big you want the stem to be.

Fold the fabric in half lengthwise with the right sides together. Now either use your machine if its handy or hand sew the long sides together. Then flip the fabric outside out and sew the bottom together.

Now its time to attach the stem to the top. If you are making small pumpkins its easier to just hot glue the stems on otherwise sew it on.
Now enjoy your pumpkin!!!


Monday, September 26, 2011
Leaves for your Window

This is similar to something that my daughter and I did in the spring with crayons. These are fun to look at and creates some cool shadows to look at as well.
First thing we did was go outside and find some "cool" leafs. Then collected the rest of the supplies that we needed which were:

Turn your iron on a low setting and allow it to warm up while you design how you want your leaves to look on the wax paper.

This was my daughter's favorite part she can't wait to do more when we find some other colored leaves. Lay your leaves on half of the wax paper.

Then fold your wax paper over creating a "sandwich" around the leaves.

Then put the wax paper between some paper, I like using that brown paper that comes in some packages. Then run the iron over it for about 30 sec and then check to see if the wax paper is sealing together, keep rubbing and checking until its sealed together it might take a little bit depending on how warm your iron is.

This is what it looks like when it is sealed.
Then hang in your windows to enjoy the different colors in your window.
Friday, September 23, 2011
Fall Door for your Honey
Remember the door that my daughter decorated in yesterday's post? Well I had to do ours and why not turn it into a nice little note for my hubby.


Thursday, September 22, 2011
Fall Door
Remember the door from Valentines Day and St. Patrick's day, well we went at it again. My daughter and I traced and cut out leaves to hang on her door.


My daughter traced different leaves on different colors of construction paper. She also did a couple of pumpkins on orange.

She did a pretty good job tracing.

Here is her completed door, she designed how the door looks. She kept pointing it out everyone in the house.
Wednesday, September 21, 2011
A sneek peek
Here is a sneek peek of the fabric I am using to make a present for my daughter.
 More glimpses to follow as I progress on the project. I love the bright colors.

Tuesday, September 20, 2011
FHE tray
I have had this tray laying around for a year, I painted the edges black and the base white. I couldn't quite figure out what I wanted to do with it. Then suddenly it hit me what I could do.


I had chalkboard paint laying around that I bought on clearance at Wal-Mart. Then using my cricut I cut some vinyl and put it on the tray. It has worked great so far.
Monday, September 19, 2011
Why?
I'm trying to figure out why since my daughter started school two weeks ago and I have a lot more time to do things, especially while the baby is napping that I have been the least productive. I am determine to do better this week!!!!! Wish me luck :)
Friday, September 16, 2011
Easy Homemade Lasagna

It is starting to turn a bit cooler and you feel like you can actually turn on the oven and not roast yourself out of the house. Why not make some lasagna? Here is how I make mine.
Start out with getting your lasagna noodle cooking according to the directions on the box. While the noodles are cooking:


After draining the noodles, I put everything in one spot to assemble everything together. My family is still relatively small so I put it in a 8x8 pan. Beginning with a layer of sauce on the bottom, I then use tongs to grab the noodles (because they are still burning hot at this point) and lay them across the sauce. Then I put a layer of the cheese mixture on the noodles, again add a layer of noodles on the cheese mixture and continue the process again with sauce and cheese.

Subscribe to:
Posts (Atom)